So you have bought a shiny new digital camera and want to share your pictures from last vacation on your WordPress blog? Great idea, but how do you add your images in a professional looking grid-like gallery view? Most folks start searching for WordPress plugins that will help them create a gallery in WordPress, but you don’t really need a plugin for this. WordPress has a built-in gallery feature that a lot of users don’t know about. In this article, we will show you how to create an image gallery in WordPress. The goal is to add your images in a gallery that looks nice and clean. We will also show you how to open your images in a carousel or lightbox view to create an immersive full-screen experience.
Note: If you want to watch the video version of this, then we have it available in our free WordPress videos section.
Creating an Image Gallery in WordPress
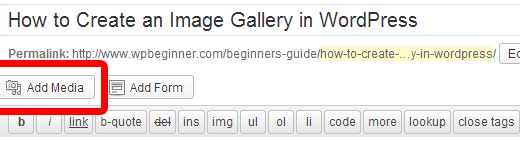
First thing you need to do is to create a new post. Alternatively if you want to add the gallery to an existing post, then click to edit that post. Once you are on the post edit screen, you need to click on the Add Media button.
This will open the WordPress media uploader. Now you need to click on Create Gallery link that you see on the left side of the screen. To add images to the gallery, you can either upload the images from your computer or choose existing images from your media library (images that you have previously uploaded to your site). All you have to do is select the images you want by clicking on them. This will add a checked mark that you see on each image in the screenshot below.

Once you have selected all the images that you want to add in your gallery, click on “Create New Gallery” button in the media uploader. Media uploader will then show your selected images in the Edit Gallery view. Here you can add captions to your images, change gallery settings, and rearrange the order of images by simply dragging and dropping them in the order you want them to appear in. When you are done with editing the gallery, click on the Insert Gallery button.

Clicking on Insert Gallery button will close the media uploader and insert the gallery code inside your WordPress post. If you are using the Visual Editor then you will see a box in post edit area indicating that there is gallery code.

If you are using simple text editor mode to write your post, then you will see your gallery shortcode. Something like this:
[gallery ids="5,8,6,7,9,10,11,12"]
Check your gallery by clicking on the post preview button. If you are unsatisfied with the look then you can always click on Add Media button to edit gallery settings. You can rearrange order, increase or decrease image columns, add or remove an image or description. Once you are happy with the way it looks, you can publish your post and your gallery will be visible for everyone.
Note: Yes, this technique can be used for pages as well. If you want to add an image gallery to WordPress pages, then follow the same exact method.
Now that we have created an image gallery in WordPress, lets take a look at how to make it look prettier and easier to browse through.
Show Gallery Images in Carousel
The carousel view for images in WordPress gallery is similar to the photo view in Facebook. Originally this feature started out as part of the Jetpack plugin which is a collection of plugins released by WordPress.com. However, the problem with the Jetpack is that it requires you to connect your site with WordPress.com even if there is no need to do so. Sometime ago, we decided to fork the Carousel plugin from Jetpack and release it as a standalone plugin for everyone who wants to use it.

To use the carousel for your image galleries, first thing you need to do is install and activate the Carousel without Jetpack plugin. Once you activate it, this plugin will work out of the box meaning you don’t need to configure anything. Just go to your gallery post and click on an image in the gallery to see it in action. Or check out our image gallery below:


There are a few changes you can make to the plugin. To configure it go to Settings » Media scroll down to Image gallery carousel. Here you can choose either a black or white background for carousel view. Or disable exif data or the carousel view itself.

There are several other plugins to create amazingly beautiful image galleries with WordPress. However, for most people the default gallery feature is perfect for their needs. If you don’t mind playing with the codes, then check out this cool example of how we extended the default gallery functionality to create a photo album gallery in WordPress. If you find yourself adding a lot of images to your blog or you are a photoblogger, then we highly recommend that you check out showcase of best photography themes for WordPress.
We hope that you found this article helpful and it helped you create an image gallery in your WordPress site. If you have questions or suggestions, then please leave a comment below.
To leave a comment please visit How to Create an Image Gallery in WordPress on WPBeginner.
No comments:
Post a Comment